back to repairs
2023.07.20 Robin's DJI Mini
2023.07.20 Robin's DJI Mini:
A co-worker's DJI Mini 2 ran into a tree and broke one of the retractable prop booms. He found a replacement
boom but wasn't excited about un-soldering and re-soldering the wires, so I took care of it.
There was a useful video on youtube (by the group selling the parts) that I was able to use for the repair,
although it hid some of the complexity of the repair. I'm sure they make the video not just to show the user
how to do the repair, but also to convince them it's quick, easy, and safe to do. (and in many cases, it's
NOT quick, NOT easy, and NOT safe for the average person to do!) This video was no exception to that rule.
But it got done anyway. I wouldn't quite call it "good as new", given the lack of replacement consumables
such as a new wiring harness or loom, no replacement adhesive foam pad, no glue to attach the wire cover, etc.
But it's good enough, and a lot less expensive than a trip to DJI's repair shop.
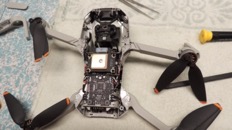
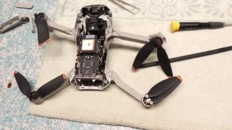
I only took a few pictures for this repair, just to make sure I got the wires reinstalled correctly. It's
only three wires (not counting the antenna) but there are no second chances to get that right. Powering up a
motor that's wired wrong will do SERIOUS damage. So that got triple-checked.
There's a link below to the repair walk-through video by DJI Solutions. If you're going to try this, here's
what you need to know:
- be very careful prying the two plastic covers off, they are held by clips that break very easily
- avoid accidentally handling the camera (so you don't damage it or throw off the calibration)
- work slowly and place removed parts (like the screws and clutch) in a container. work on a towel.
- that blue heat sink compound is sticky and it stains, try to avoid touching it
- at 1:44 he pries up the wires - they are HOT GLUED down, carefully remove the glue before lifting up wires
(his mini already had the glue removed prior to filming... cheater!)
- the clutch really will try to fly out of the arm when you push it out from below, it's under tension
- you're not going to get that foam disc off without tearing it. just replace it with something else.
- measure wire lengths before pulling the wire out of the arm so you know lengths for reassembly
- at 2:31 he yanks the antenna out of the loom. I am SHOCKED he didn't rip the connector off. be gentle!
- there's a cut at 3:47 to skip over the 5 minutes he spent getting that clutch reinstalled. gentle!
Also you have to know how to disconnect and reconnect the antenna cable or you'll damage it both ways. Look
up "U.FL IPX" connectors for videos and instructions on doing this safely. I've seen two people break these
connectors due to mishandling, and you will seriously regret it if you break the connector. Basically to
unplug it, lift the wire up off the board about 1/2 inch back from the connector, it'll rock and pop right
off. To reattach, do the reverse. Come in at a 45 degree angle and "hook" the lip of the port with the edge
of the connector, and simultaneously lower the angle of the wire while applying downward pressure on the
middle of the connector with a fingernail. (I've literally done hundreds of these, this is how you do it)

repair video by DJI Solutions (YouTube)
Robin's DJI repair 1:
Robin's DJI repair 2:
highest resolution images
last updated 05/20/2025 at 19:24:41 by make_www_index.command version 2025.05.20.B

